
FAQs
Tub Light Install Guides
STEP-BY-STEP INSTALLATION GUIDE
TOOLS YOU'LL NEED:
- A flat-head screwdriver or trim removal tool
- A Phillips head screwdriver
- Your new HIMOD tail lights
- Open your tailgate and locate the two screws holding the factory tail light in place.
- Unscrew and gently pull the tail light assembly away from the vehicle.
- Disconnect the wiring harness from the back of the factory light.
- Connect the new HIMOD tail lights to the factory harness.
- Align the new light assembly and clip it into place. Re-insert the two screws to secure it.
- Repeat for the other side and test all functions to ensure they're working correctly.

COMMON QUESTIONS
- Q: Do these LED tail lights cause hyper flashing or a fast blink?
- A: No. Our tail lights are designed with built-in resistors to ensure the indicators flash at the correct rate, just like your factory lights. There is no need for any additional wiring.
- Q: Are these Hilux LED tail lights waterproof and pressure wash safe?
- A: Yes, absolutely. With a high IP66 rating, our lights are designed to be completely dustproof and pressure wash safe. They are sealed to prevent water ingress, so you can clean your vehicle without any worries. We recommend being at least 30cm away when pressure washing.
- Q: What is the warranty period for HIMOD 4X4 tail lights?
- A: We stand by the quality of our products with a comprehensive 2-year warranty. This covers any manufacturing defects, giving you total peace of mind.
- Q: What is the best way to care for and maintain my new LED tail lights?
- A: The durable materials and sealed design of our lights require minimal maintenance. Simply keep them clean with a pH-neutral wash. After any intense off-roading in salt or dirt, ensure to give them a good clean.
STEP-BY-STEP INSTALLATION GUIDE
TOOLS YOU'LL NEED
- A flat-head screwdriver or trim removal tool
- A Phillips head screwdriver
- Your new HIMOD tail lights
- Open your tailgate and locate the two screws holding the factory tail light in place.
- Unscrew and gently pull the tail light assembly away from the vehicle.
- Disconnect the wiring harness from the back of the factory light.
- Connect the new HIMOD tail lights to the factory harness.
- Align the new light assembly and clip it into place. Re-insert the two screws to secure it.
- Repeat for the other side and test all functions to ensure they're working correctly.

COMMON QUESTIONS
Q: Do these LED tail lights cause hyper flashing or a fast blink?
A: No. Our tail lights are designed with built-in resistors to ensure the indicators flash at the correct rate, just like your factory lights. There is no need for any additional wiring.Q: Are these Hilux LED tail lights waterproof and pressure wash safe?
A: Yes, absolutely. With a high IP66 rating, our lights are designed to be completely dustproof and pressure wash safe. They are sealed to prevent water ingress, so you can clean your vehicle without any worries. We recommend being at least 30cm away when pressure washing.Q: What is the warranty period for HIMOD 4X4 tail lights?
A: We stand by the quality of our products with a comprehensive 2-year warranty. This covers any manufacturing defects, giving you total peace of mind.Q: What is the best way to care for and maintain my new LED tail lights?
A: The durable materials and sealed design of our lights require minimal maintenance. Simply keep them clean with a pH-neutral wash. After any intense off-roading in salt or dirt, ensure to give them a good clean.
FINAL THOUGHTS: ARE THEY WORTH IT?
STEP-BY-STEP INSTALLATION GUIDE
TOOL'S YOU'LL NEED
- A flat-head screwdriver or trim removal tool
- A Phillips head screwdriver
- Your new HIMOD tail lights
- Open your tailgate and locate the two screws holding the factory tail light in place.
- Unscrew and gently pull the tail light assembly away from the vehicle.
- Disconnect the wiring harness from the back of the factory light.
- Connect the new HIMOD tail lights to the factory harness.
- Align the new light assembly and clip it into place. Re-insert the two screws to secure it.
- Repeat for the other side and test all functions to ensure they're working correctly.
COMMON QUESTIONS
Q: Do these LED tail lights cause hyper flashing or a fast blink?
A: No. Our tail lights are designed with built-in resistors to ensure the indicators flash at the correct rate, just like your factory lights. There is no need for any additional wiring.Q: Are these Ranger LED tail lights waterproof and pressure wash safe?
A: Yes, absolutely. With a high IP66 rating, our lights are designed to be completely dustproof and pressure wash safe. They are sealed to prevent water ingress, so you can clean your vehicle without any worries. We recommend being at least 30cm away when pressure washing.Q: What is the warranty period for HIMOD 4X4 tail lights?
A: We stand by the quality of our products with a comprehensive 2-year warranty. This covers any manufacturing defects, giving you total peace of mind.Q: What is the best way to care for and maintain my new LED tail lights?
A: The durable materials and sealed design of our lights require minimal maintenance. Simply keep them clean with a pH-neutral wash. After any intense off-roading in salt or dirt, ensure to give them a good clean.
STEP-BY-STEP INSTALLATION GUIDE
Tools You'll Need:
A flat-head screwdriver or trim removal tool
A 10mm socket wrench
Your new HIMOD tail lights
Open your tailgate and locate the two 10mm bolts holding the factory tail light in place.
Unscrew the bolts and gently pull the tail light assembly away from the vehicle. It may be held by a clip, so a firm pull may be needed to release it.
Disconnect the wiring harness from the back of the factory light. You may need to press in on a central lock to release the connector.
Connect the new HIMOD tail lights to the factory harness.
Align the new light assembly and push it into place, ensuring the clip is secure. Re-insert the two bolts and tighten.
Repeat for the other side and test all functions to ensure they're working correctly.
COMMON QUESTIONS
Q: Do these LED tail lights cause hyper flashing or a fast blink? A: No. Our tail lights are designed with an inbuilt CANBUS resistor to ensure the indicators flash at the correct rate, just like your factory lights. There is no need for any additional wiring.
Q: Are these Navara LED tail lights waterproof and pressure wash safe? A: Yes, absolutely. With a high IP66 rating, our lights are designed to be completely dustproof and pressure wash safe. They are sealed to prevent water ingress, so you can clean your vehicle without any worries. We recommend being at least 30cm away when pressure washing.
Q: What is the warranty period for HIMOD 4X4 tail lights? A: We stand by the quality of our products with a comprehensive 2-year warranty. This covers any manufacturing defects, giving you total peace of mind.
Q: What is the best way to care for and maintain my new LED tail lights? A: The durable materials and sealed design of our lights require minimal maintenance. Simply keep them clean with a pH-neutral wash. After any intense off-roading in salt or dirt, ensure to give them a good clean.
STEP-BY-STEP INSTALLATION GUIDE
TOOLS YOU'LL NEED
- A flat-head screwdriver or trim removal tool
- A Phillips head screwdriver
- Your new HIMOD tail lights
- Open your tailgate and locate the two screws holding the factory tail light in place.
- Unscrew and gently pull the tail light assembly away from the vehicle.
- Disconnect the wiring harness from the back of the factory light.
- Connect the new HIMOD tail lights to the factory harness.
- Align the new light assembly and clip it into place. Re-insert the two screws to secure it.
- Repeat for the other side and test all functions to ensure they're working correctly.

COMMON QUESTIONS
Q: Do these LED tail lights cause hyper flashing or a fast blink?
A: No. Our tail lights are designed with built-in resistors to ensure the indicators flash at the correct rate, just like your factory lights. There is no need for any additional wiring.Q: Are these Navara LED tail lights waterproof and pressure wash safe?
A: Yes, absolutely. With a high IP66 rating, our lights are designed to be completely dustproof and pressure wash safe. They are sealed to prevent water ingress, so you can clean your vehicle without any worries. We recommend being at least 30cm away when pressure washing.Q: What is the warranty period for HIMOD 4X4 tail lights?
A: We stand by the quality of our products with a comprehensive 2-year warranty. This covers any manufacturing defects, giving you total peace of mind.Q: What is the best way to care for and maintain my new LED tail lights?
A: The durable materials and sealed design of our lights require minimal maintenance. Simply keep them clean with a pH-neutral wash. After any intense off-roading in salt or dirt, ensure to give them a good clean.

STEP-BY-STEP INSTALLATION GUIDE
TOOLS YOU’LL NEED:
A flat-head screwdriver or trim removal tool
A Phillips head screwdriver
Your new HIMOD tail lights
Open your tailgate and locate the bolts holding the factory tail light in place.
Unscrew and gently pull the tail light assembly away from the vehicle.
Disconnect the factory wiring harness.
Connect your new HIMOD tail lights. Your main lighting functions (brake, park, indicators) can be hooked directly to the factory wiring.
For full functionality: Connect the lights into the rear bumper light harness. Note that some Australian Patrol models (DX and ST) may require you to tap into your current working tail lights to complete the installation.
Align the new light assembly and clip it into place. Re-insert the screws to secure it.
Repeat for the other side and test all functions to ensure they're working correctly.
COMMON QUESTIONS
Q: Do these LED tail lights cause hyper flashing or a fast blink?
A: No. Our tail lights come with pre-mounted 50W load resistors to ensure the indicators flash at the correct rate, just like your factory lights.Q: Are these Patrol LED tail lights waterproof and pressure wash safe?
A: Yes, absolutely. With a high IP66 rating, our lights are designed to be completely dustproof and pressure wash safe. They are sealed to prevent water ingress, so you can clean your vehicle without any worries. We recommend being at least 30cm away when pressure washing.Q: What is the warranty period for HIMOD 4X4 tail lights?
A: We stand by the quality of our products with a comprehensive 2-year warranty. This covers any manufacturing defects, giving you total peace of mind.Q: What is the best way to care for and maintain my new LED tail lights?
A: The durable materials and sealed design of our lights require minimal maintenance. Simply keep them clean with a pH-neutral wash. After any intense off-roading in salt or dirt, ensure to give them a good clean.
STEP-BY-STEP INSTALLATION GUIDE
TOOLS YOU’LL NEED:
A flat-head screwdriver or trim removal tool
A Phillips head screwdriver
Your new HIMOD lights
For the headlights, remove the grille and headlight trim ring. Unplug the factory headlight and connect the new LED headlight. Secure it and reinstall the trim and grille.
For the tail lights, open the tailgate and locate the screws holding the factory tail light in place.
Unscrew and gently pull the tail light assembly away from the vehicle. Disconnect the wiring harness.
Connect the new HIMOD lights to the factory harness.
Align the new light assembly and push it into place. Re-insert the screws to secure it.
Repeat for the other side (for tail lights) and test all functions to ensure they're working correctly.

COMMON QUESTIONS
Q: Do these LED lights cause hyper flashing or a fast blink?
A: No. Our lights are designed with built-in resistors to ensure the indicators flash at the correct rate, just like your factory lights. There is no need for any additional wiring.Q: Are these Jeep LED lights waterproof and pressure wash safe?
A: Yes, absolutely. With a high IP66 rating, our lights are designed to be completely dustproof and pressure wash safe. They are sealed to prevent water ingress, so you can clean your vehicle without any worries. We recommend being at least 30cm away when pressure washing.Q: What is the warranty period for HIMOD 4X4 lights?
A: We stand by the quality of our products with a comprehensive 2-year warranty. This covers any manufacturing defects, giving you total peace of mind.Q: What is the best way to care for and maintain my new LED lights?
A: The durable materials and sealed design of our lights require minimal maintenance. Simply keep them clean with a pH-neutral wash. After any intense off-roading in salt or dirt, ensure to give them a good clean.
STEP-BY-STEP INSTALLATION GUIDE
TOOLS YOU'LL NEED:
- A flat-head screwdriver or trim removal tool
- A Phillips head screwdriver
- Your new HIMOD tail lights
- Open your tailgate and locate the two screws holding the factory tail light in place.
- Unscrew and gently pull the tail light assembly away from the vehicle.
- Disconnect the wiring harness from the back of the factory light.
- Connect the new HIMOD tail lights to the factory harness.
- Align the new light assembly and clip it into place. Re-insert the two screws to secure it.
- Repeat for the other side and test all functions to ensure they're working correctly.
COMMON QUESTIONS
Q: Do these LED tail lights cause hyper flashing or a fast blink?
A: No. Our tail lights are designed with built-in resistors to ensure the indicators flash at the correct rate, just like your factory lights. There is no need for any additional wiring.Q: Are these Amarok LED tail lights waterproof and pressure wash safe?
A: Yes, absolutely. With a high IP66 rating, our lights are designed to be completely dustproof and pressure wash safe. They are sealed to prevent water ingress, so you can clean your vehicle without any worries. We recommend being at least 30cm away when pressure washing.Q: What is the warranty period for HIMOD 4X4 tail lights?
A: We stand by the quality of our products with a comprehensive 2-year warranty. This covers any manufacturing defects, giving you total peace of mind.Q: Do these lights show a fault code on my dash?
A: BUYER, PLEASE BEWARE IF YOU PURCHASE THESE LIGHT THEY MAY THROW A FAULT CODE. IF YOU PURCHASE IT'S AT YOUR OWN RISK. WE PROVIDE THE INFORMATION TO FIX THE ISSUE. Some aftermarket LED lights may cause a fault code on your dash. If this happens, a simple reprogramming procedure can resolve the issue. We provide the necessary information to help you fix this.Q: What is the best way to care for and maintain my new LED tail lights?
A: The durable materials and sealed design of our lights require minimal maintenance. Simply keep them clean with a pH-neutral wash. After any intense off-roading in salt or dirt, ensure to give them a good clean.
STEP-BY-STEP INSTALLATION GUIDE
TOOLS YOU'LL NEED
- A flat-head screwdriver or trim removal tool
- A Phillips head screwdriver
- Your new HIMOD tail lights
- Open your tailgate and locate the two screws holding the factory tail light in place.
- Unscrew and gently pull the tail light assembly away from the vehicle.
- Disconnect the wiring harness from the back of the factory light.
- Connect the new HIMOD tail lights to the factory harness.
- Align the new light assembly and clip it into place. Re-insert the two screws to secure it.
- Repeat for the other side and test all functions to ensure they're working correctly.
COMMON QUESTIONS
Q: Do these LED tail lights cause hyper flashing or a fast blink?
A: No. Our tail lights are designed with built-in resistors to ensure the indicators flash at the correct rate, just like your factory lights. There is no need for any additional wiring.Q: Are these D-MAX LED tail lights waterproof and pressure wash safe?
A: Yes, absolutely. With a high IP66 rating, our lights are designed to be completely dustproof and pressure wash safe. They are sealed to prevent water ingress, so you can clean your vehicle without any worries. We recommend being at least 30cm away when pressure washing.Q: What is the warranty period for HIMOD 4X4 tail lights?
A: We stand by the quality of our products with a comprehensive 2-year warranty. This covers any manufacturing defects, giving you total peace of mind.Q: What is the best way to care for and maintain my new LED tail lights?
A: The durable materials and sealed design of our lights require minimal maintenance. Simply keep them clean with a pH-neutral wash. After any intense off-roading in salt or dirt, ensure to give them a good clean.
STEP-BY-STEP INSTALLATION GUIDE
TOOLS YOU'LL NEED:
- A flat-head screwdriver or trim removal tool
- A Phillips head screwdriver
- Your new HIMOD tail lights
- Open your tailgate and locate the two screws holding the factory tail light in place.
- Unscrew and gently pull the tail light assembly away from the vehicle.
- Disconnect the wiring harness from the back of the factory light.
- Connect the new HIMOD tail lights to the factory harness.
- Align the new light assembly and clip it into place. Re-insert the two screws to secure it.
- Repeat for the other side and test all functions to ensure they're working correctly.
COMMON QUESTIONS
Q: Do these LED tail lights cause hyper flashing or a fast blink?
A: No. Our tail lights are designed with built-in resistors to ensure the indicators flash at the correct rate, just like your factory lights. There is no need for any additional wiring.Q: Are these Triton LED tail lights waterproof and pressure wash safe?
A: Yes, absolutely. With a high IP66 rating, our lights are designed to be completely dustproof and pressure wash safe. They are sealed to prevent water ingress, so you can clean your vehicle without any worries. We recommend being at least 30cm away when pressure washing.Q: What is the warranty period for HIMOD 4X4 tail lights?
A: We stand by the quality of our products with a comprehensive 2-year warranty. This covers any manufacturing defects, giving you total peace of mind.Q: What is the best way to care for and maintain my new LED tail lights?
A: The durable materials and sealed design of our lights require minimal maintenance. Simply keep them clean with a pH-neutral wash. After any intense off-roading in salt or dirt, ensure to give them a good clean.
STEP-BY-STEP INSTALLATION GUIDE
TOOLS YOU'LL NEED:
- A flat-head screwdriver or trim removal tool
- A Phillips head screwdriver
- Your new HIMOD tail lights
- Open your tailgate and locate the two screws holding the factory tail light in place.
- Unscrew and gently pull the tail light assembly away from the vehicle.
- Disconnect the wiring harness from the back of the factory light.
- Connect the new HIMOD tail lights to the factory harness.
- Align the new light assembly and clip it into place. Re-insert the two screws to secure it.
- Repeat for the other side and test all functions to ensure they're working correctly.

COMMON QUESTIONS
Q: Do these LED tail lights cause hyper flashing or a fast blink?
A: No. Our tail lights are designed with built-in resistors to ensure the indicators flash at the correct rate, just like your factory lights. There is no need for any additional wiring.Q: Are these Triton LED tail lights waterproof and pressure wash safe?
A: Yes, absolutely. With a high IP66 rating, our lights are designed to be completely dustproof and pressure wash safe. They are sealed to prevent water ingress, so you can clean your vehicle without any worries. We recommend being at least 30cm away when pressure washing.Q: What is the warranty period for HIMOD 4X4 tail lights?
A: We stand by the quality of our products with a comprehensive 2-year warranty. This covers any manufacturing defects, giving you total peace of mind.Q: What is the best way to care for and maintain my new LED tail lights?
A: The durable materials and sealed design of our lights require minimal maintenance. Simply keep them clean with a pH-neutral wash. After any intense off-roading in salt or dirt, ensure to give them a good clean.
STEP-BY-STEP INSTALLATION GUIDE
TOOLS YOU'LL NEED:
- A flat-head screwdriver or trim removal tool
- A Phillips head screwdriver
- Your new HIMOD tail lights
- Open your tailgate and locate the two screws holding the factory tail light in place.
- Unscrew and gently pull the tail light assembly away from the vehicle.
- Disconnect the wiring harness from the back of the factory light.
- Connect the new HIMOD tail lights to the factory harness.
- Align the new light assembly and clip it into place. Re-insert the two screws to secure it.
- Repeat for the other side and test all functions to ensure they're working correctly.
COMMON QUESTIONS
Q: Do these LED tail lights cause hyper flashing or a fast blink?
A: No. Our tail lights are designed with built-in resistors to ensure the indicators flash at the correct rate, just like your factory lights. There is no need for any additional wiring.Q: Are these Triton LED tail lights waterproof and pressure wash safe?
A: Yes, absolutely. With a high IP66 rating, our lights are designed to be completely dustproof and pressure wash safe. They are sealed to prevent water ingress, so you can clean your vehicle without any worries. We recommend being at least 30cm away when pressure washing.Q: What is the warranty period for HIMOD 4X4 tail lights?
A: We stand by the quality of our products with a comprehensive 2-year warranty. This covers any manufacturing defects, giving you total peace of mind.Q: What is the best way to care for and maintain my new LED tail lights?
A: The durable materials and sealed design of our lights require minimal maintenance. Simply keep them clean with a pH-neutral wash. After any intense off-roading in salt or dirt, ensure to give them a good clean.
STEP-BY-STEP INSTALLATION GUIDE
TOOLS YOU'LL NEED:
- A flat-head screwdriver
- A Phillips head screwdriver
- Your new HIMOD tail lights
- Open your tailgate and locate the three Phillips head screws holding the factory tail light in place.
- Unscrew and gently pull the tail light assembly away from the vehicle.
- Disconnect the wiring harness from the back of the factory light.
- Connect the new HIMOD tail lights to the factory harness.
- Align the new light assembly and clip it into place. Re-insert the three screws to secure it.
- Repeat for the other side and test all functions to ensure they're working correctly.
COMMON QUESTIONS
Q: Do these LED tail lights cause hyper flashing or a fast blink? A: No. Our tail lights are designed with built-in resistors to ensure the indicators flash at the correct rate, just like your factory lights.
Q: Are these LandCruiser LED tail lights waterproof and pressure wash safe? A: Yes, absolutely. With a high IP66 rating, our lights are designed to be completely dustproof and pressure wash safe. They are sealed to prevent water ingress, so you can clean your vehicle without any worries. We recommend being at least 30cm away when pressure washing.
Q: What is the warranty period for HIMOD 4X4 tail lights? A: We stand by the quality of our products with a comprehensive 2-year warranty. This covers any manufacturing defects, giving you total peace of mind.
Q: What is the best way to care for and maintain my new LED tail lights? A: The durable materials and sealed design of our lights require minimal maintenance. Simply keep them clean with a pH-neutral wash. After any intense off-roading in salt or dirt, ensure to give them a good clean.
STEP-BY-STEP INSTALLATION GUIDE
TOOLS YOU’LL NEED:
- A flat-head screwdriver or trim removal tool
- A Phillips head screwdriver
- Your new HIMOD tail lights
- Open your tailgate and locate the two screws holding the factory tail light in place.
- Unscrew and gently pull the tail light assembly away from the vehicle.
- Disconnect the wiring harness from the back of the factory light.
- Connect the new HIMOD tail lights to the factory harness.
- Align the new light assembly and clip it into place. Re-insert the two screws to secure it.
- Repeat for the other side and test all functions to ensure they're working correctly.
COMMON QUESTIONS
Q: Do these LED tail lights cause hyper flashing or a fast blink?
A: No. Our tail lights are designed with built-in resistors to ensure the indicators flash at the correct rate, just like your factory lights. There is no need for any additional wiring.
Q: Are these Prado LED tail lights waterproof and pressure wash safe?
A: Yes, absolutely. With a high IP67 rating, our lights are designed to be completely dustproof and pressure wash safe. They are sealed to prevent water ingress, so you can clean your vehicle without any worries. We recommend being at least 30cm away when pressure washing.
Q: What is the warranty period for HIMOD 4X4 tail lights?
A: We stand by the quality of our products with a comprehensive 2-year warranty. This covers any manufacturing defects, giving you total peace of mind.
Q: What is the best way to care for and maintain my new LED tail lights?
A: The durable materials and sealed design of our lights require minimal maintenance. Simply keep them clean with a pH-neutral wash. After any intense off-roading in salt or dirt, ensure to give them a good clean.
STEP-BY-STEP INSTALLATION GUIDE
Tools You'll Need:
A flat-head screwdriver or trim removal tool
A Phillips head screwdriver
Your new HIMOD tail lights
Open your tailgate and locate the two screws holding the factory tail light in place.
Unscrew and gently pull the tail light assembly away from the vehicle.
Disconnect the wiring harness from the back of the factory light.
Connect the new HIMOD tail lights to the factory harness.
Align the new light assembly and clip it into place. Re-insert the two screws to secure it.
Repeat for the other side and test all functions to ensure they're working correctly.
COMMON QUESTIONS
Q: Do these LED tail lights cause hyper flashing or a fast blink?
A: No. Our tail lights are designed with built-in resistors to ensure the indicators flash at the correct rate, just like your factory lights. There is no need for any additional wiring.Q: Are these Prado LED tail lights waterproof and pressure wash safe?
A: Yes, absolutely. With a high IP66 rating, our lights are designed to be completely dustproof and pressure wash safe. They are sealed to prevent water ingress, so you can clean your vehicle without any worries. We recommend being at least 30cm away when pressure washing.Q: What is the warranty period for HIMOD 4X4 tail lights?
A: We stand by the quality of our products with a comprehensive 2-year warranty. This covers any manufacturing defects, giving you total peace of mind.Q: What is the best way to care for and maintain my new LED tail lights?
A: The durable materials and sealed design of our lights require minimal maintenance. Simply keep them clean with a pH-neutral wash. After any intense off-roading in salt or dirt, ensure to give them a good clean.
Tray Light Wiring Layouts
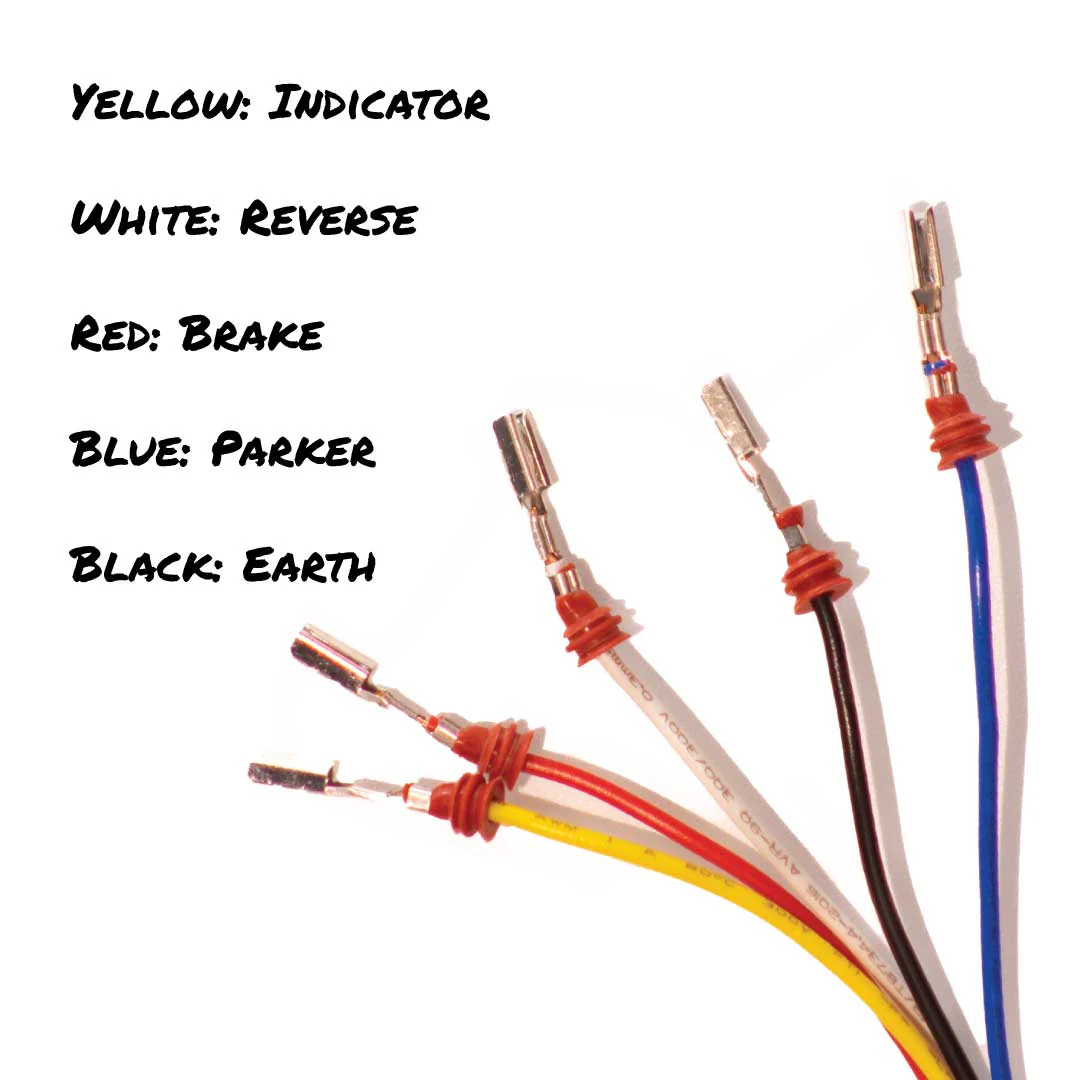
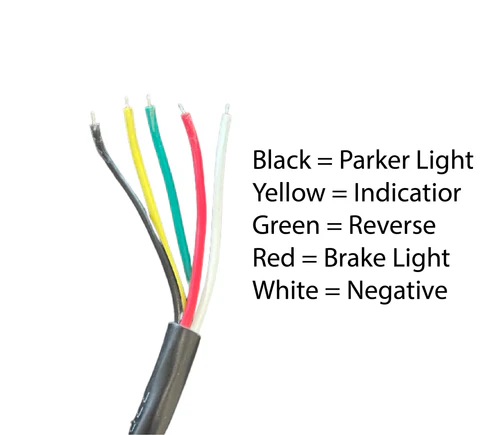
Wiring Layout:
- Blue: Parker Light ( Headlight On )
- Red: Brake Light
- Orange / Yellow: Indicator
- White / Green: Reverse
- Black: Earth
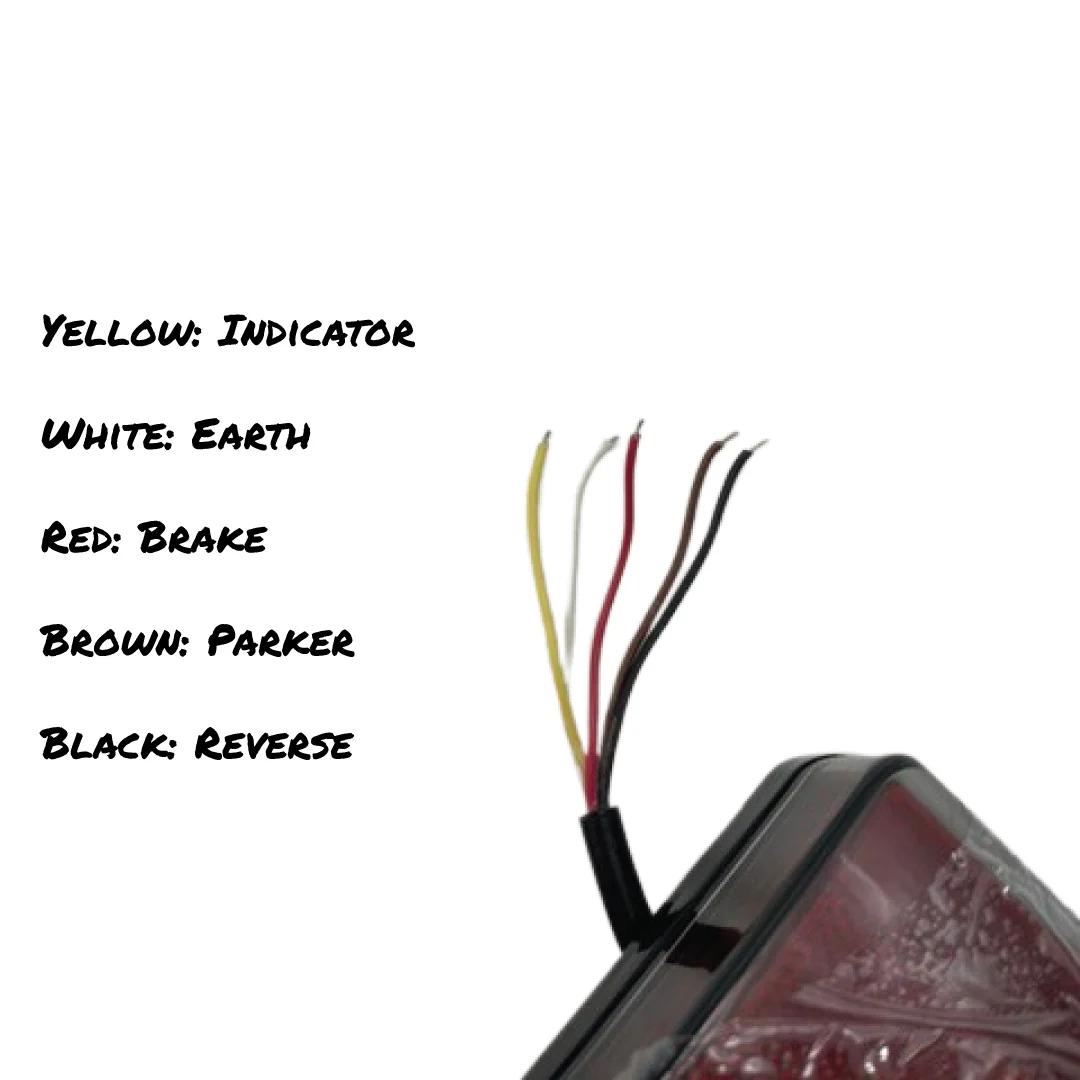
Wiring Layout:
- Yellow: Indicator
- Black: Earth
- White: Reverse
- Red: Brake
- Blue: Parkers
Wiring Layout:
- Red: Brake
- Yellow: Indicator
- White: Parker
- Black: Earth
Additional Products
A GUIDE FOR ALL MODELS
This video demonstrates the installation process for our sequential mirror indicators on a Toyota Hilux. While the video is specific to the Hilux, the process is very similar for all of our sequential mirror indicators across different vehicles. If you have any questions or require additional assistance, please don't hesitate to reach out to our team at [email protected]
- Left & right sequential mirror indicator assemblies (pair)
- Plastic trim/fitment tool
- Plastic trim tools (non-marring)
- Small flat screwdriver (optional)
- Torx driver (T10/T15)
- Clean microfiber towel or masking tape (to protect paint/glass)
- Gloves (recommended)
- Park on level ground, turn ignition OFF, and fold mirrors out.
- If your vehicle has an auto-fold module, disable it for the install.
- Protect the lower edge of the mirror cap and glass with tape or a towel.
- Remove mirror glass
- Tilt the mirror fully inward & upward to expose the lower inner edge.
- Slip a plastic trim tool behind the glass at the inner edge and gently pry.
- Support the glass with your other hand and pop it off the central clips.
- If heated, unplug the two spade terminals and set the glass aside safely.
- Remove mirror cap (cover)
- From the underside, release the plastic clips along the bottom edge using a trim tool.
- Work around the perimeter; the cap will unclip and lift away. Take your time.
- Remove factory indicator
- Locate the indicator module inside the housing (outer corner).
- Unplug the 2-pin connector.
- Remove the small Torx screws securing the indicator and lift it out.
- Fit the new sequential indicator
- Position the new unit in place; reinstall the Torx screws snug, not overtight.
- Plug in the 2-pin connector until it clicks.
- Test before reassembly
- Turn ignition ON and activate the indicator/hazards.
- Check for the sweeping (sequential) motion and full brightness.
- Turn ignition OFF.
- Reinstall mirror cap
- Align the cover; press around the edges until all clips engage.
- Reinstall mirror glass
- If heated, reconnect the two spade terminals (either orientation as removed).
- Align the glass to the central mount and press evenly until it clicks home.
- Wipe fingerprints, remove protective tape.
- Final check
- Test indicators and hazards again on both sides.
- Ensure mirrors fold (if applicable) and glass adjusts freely.
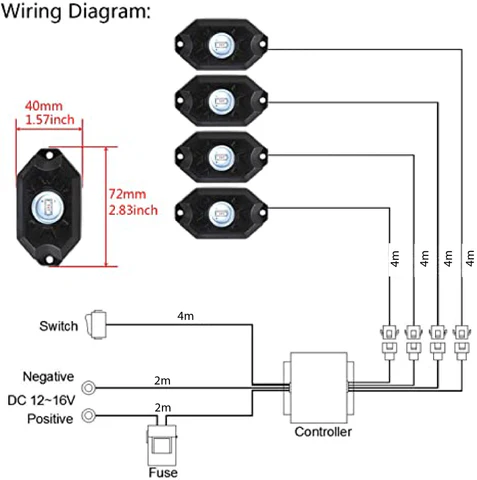
How To Install:
1: Mount on a Metal Surface:
Secure the load resistor to a metal surface (like the vehicle’s chassis or a dedicated mounting bracket) to help dissipate heat effectively, as it can reach temperatures of up to 170°C during operation. Make sure it's mounted away from any sensitive components or wiring that could be damaged by heat.
2: Wire Between Lamp Inputs:
Identify the Wires: Locate the positive (often marked with red or a '+' symbol) and negative (usually black or a '-' symbol) input wires of the LED lamp you are working with.
Disconnect Power: Before making any connections, disconnect the power supply to avoid accidental short circuits or shocks.
Connect the Resistor: Take one end of the resistor and connect it to the positive wire of the lamp. Connect the other end of the resistor to the negative wire of the lamp, ensuring that the resistor joins the circuit and allows the current to flow continuously. This wiring method allows the resistor to load the circuit properly without affecting the vehicle’s chassis.
3: Final
Secure Connections:
Use Proper Connectors: Utilize heat shrink tubing or electrical connectors to secure the connections and prevent exposure to moisture and corrosion.
Double Check Connections: Ensure that all connections are tight and insulated properly to avoid any loose wiring, which can lead to electrical issues or flickering lights.
Test the System: After installation, reconnect the power supply and test the lights to ensure everything is functioning correctly. Check for any hyper-flashing or error codes, confirming the resistors are properly wired and operational.
FAQ's
Handling Time:
Items ordered before 12pm will be shipped same day, if the product page specifies.
For other items please allow 24 - 48 hours for your items to be prepared/processed before shipment. Unless on backorder or pre-order.
Shipping Within Australia & New Zealand Only:
No pickup/collection is available. Items shipped from Sunshine Coast QLD Australia.
Shipping Times (Australia):
- Australia Post Standard 5 - 9 Days
- Express Australia Post 1 - 3 Days
Shipping Times (New Zealand):
- Australia Post International Standard 8 - 13 Days
- Australia Post International Express 5 - 10 Days
Shipping Times (USA):
- Australia Post International Standard 10 - 15 Days
- Australia Post International Express 7 - 10 Days
Shipping Times Backorder:
- Items on backorder are sent from our factory and can take up to 14 days to deliver once shipped.
- Check product page for exact back order delay.
You will receive an email with tracking information once your order has been dispatched. If you haven't received an email confirming dispatch, it's possible that your order is still being processed or your item is out of stock. Please check the ETA for your product provided on our website for the most current information. We will send your order as soon as we replenish our stock.
We offer tail lights compatible with various car models. Please reach out with your vehicle details or keep an eye on our website and social media channels for updates on new product releases. If you are interested in a certain product, check the item description or contact us to confirm compatibility.
We use AusPost for deliveries, ensuring a reliable service to get your order delivered to you. We can use DHL, FedEx or UPS if you desire. Please reach out for us to customise this service for you.